How to start working on large codebase
General advice
First, recognize that you CANNOT understand everything in the codebase unless you have LOTS of time to waste.
Set a specific goal: “I want to understand how a specific feature works!”
- Some front end user interactions:
- I want to understand how we show courses as people type course names/numbers
- I want to understand how we add course to a specific plan (how do we associate a specific course to a specific year)
- I want to understand how we track degree progress and display it
- I want to understand how we check for pre reqs and display warning popups
Second, make a diagram of the user’s journey: What steps does the user take to make a 4-year plan on uCredit?
Example diagram of uCredit user's journey
1. Main landing page:
    a. Can click “log in” (top right) or “get started” (middle) - both bring user to [https://ucredit.me/login](https://ucredit.me/login)
    b. Can click “contact us” (brings up application form) to join team
2. Click login at homepage → login page
    a. JHU Login
    b. Continue as guest
3. Dashboard
    a. Header
        1. Click on the comments icon (shows comments from other users? It shows up blank for me)
        2. Click on the notifications icon
        3. Click on three bars
            1. Reviewer dashboard (shows reviewees)
            2. Sign out
    b. Year
        1. Toggle year (expand/collapse)
        2. Rename year (all)
        3. Change year (all)
        4. Select terms (all except AP equivalents)
        5. Remove (all except AP equivalents)
    c. Semester
        1. Hover over + sign and click text bubble to add comment
    d. Course
        1. To add new course
            1. Click + sign next to any semester
            2. Shows search bar for courses
            3. Type in course name or number
            4. Click on course
            5. Click “Add Course”
        2. To update course
            1. Click on any course already in the plan
            2. Can update term, year, and area
            3. Click “Update Course”
    e. Click on bar graph icon below the three bars icon
        1. Create new plan
        2. Degree progress
        3. Edit plan
            1. Rename plan
            2. View/Add majors
            3. Share
            4. Add year
            5. Delete plan
        4. Reviewers
            1. Add or remove reviewers
Third, read existing code with a specific goal from the first step in mind. Or, you could try to find code that generates certain steps in user’s journey from the second step.
More Tips!
- Ctrl-click on an element in VSCode to find its definition
- Practice top to bottom approach (be able to look at high level feature on website and identify its source code in the codebase)
Top to bottom example
Website feature: adding a course to fall 2021 semester.
Where in the codebase can we locate this function?
Answer
File location: lib > components > popups > course-search > search-results > CourseDisplay.tsx
Important code: CourseDisplay function component which contains the addCourse function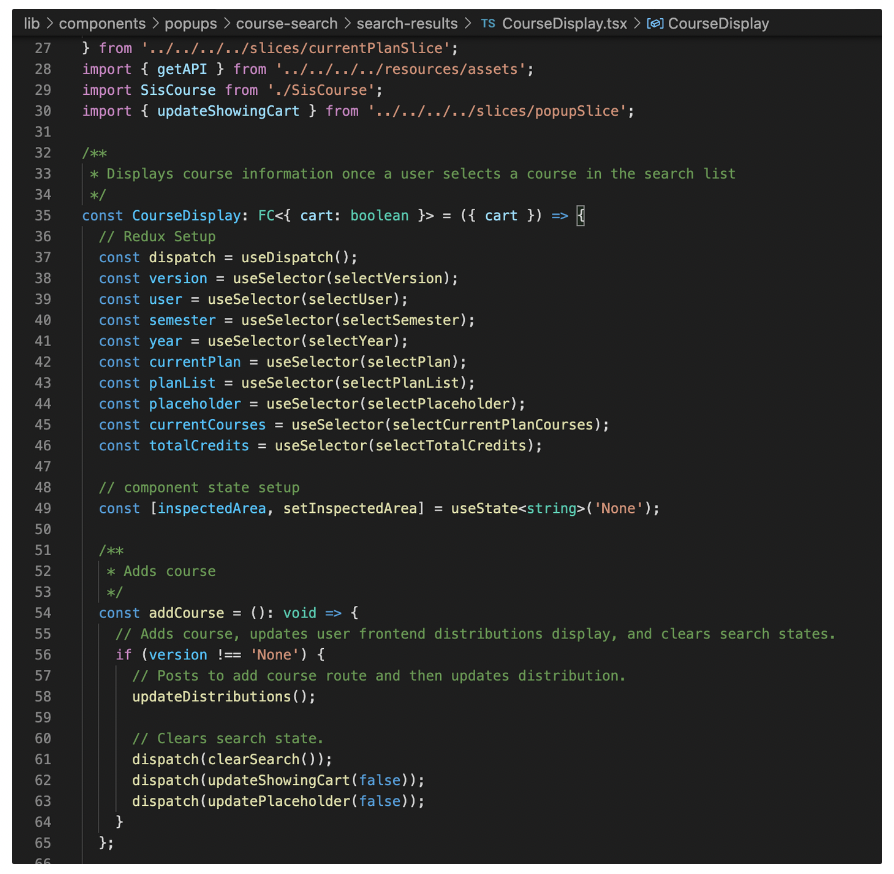
- Practice bottom to top approach (be able to look at any code snippet in the codebase and identify which high level feature or user interaction it generates on the website)
{" "}
Bottom to top example
File location: lib > components > dashboard > degree-info > DistributionBarsJSX.tsx
Which feature on uCredit website does the following code snippet render? Feel free to open the file and examine the code.Answer
The code generates the blue distribution bars in Degree Progress.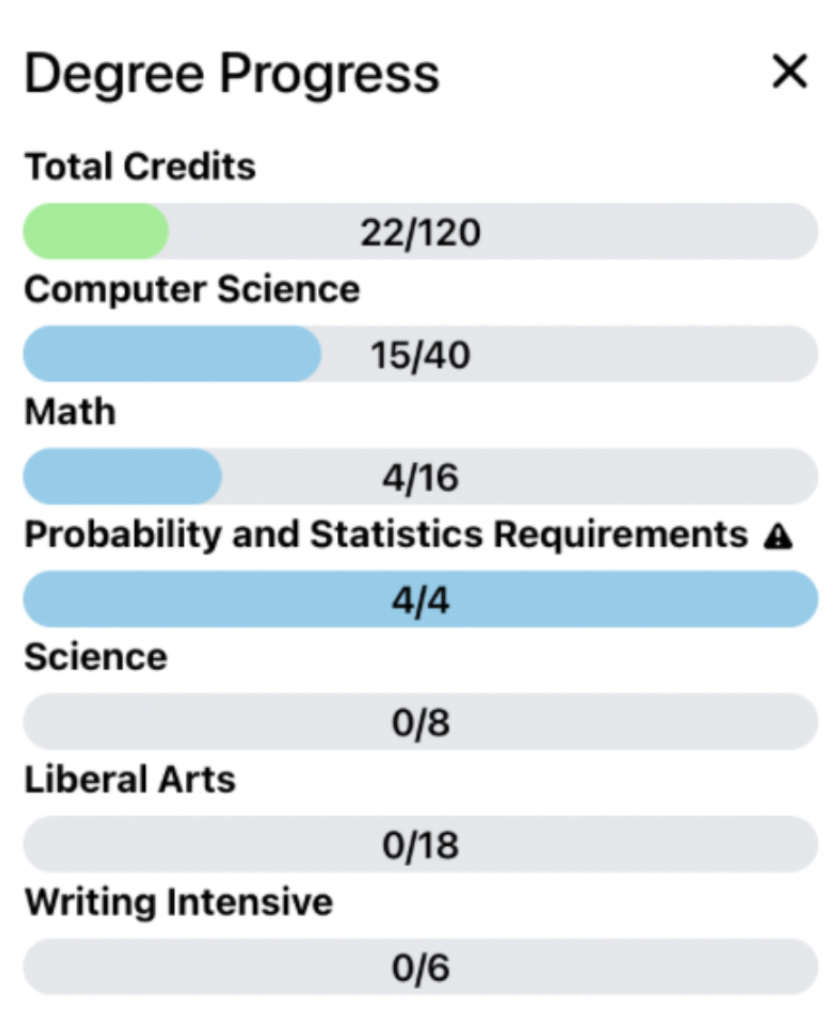
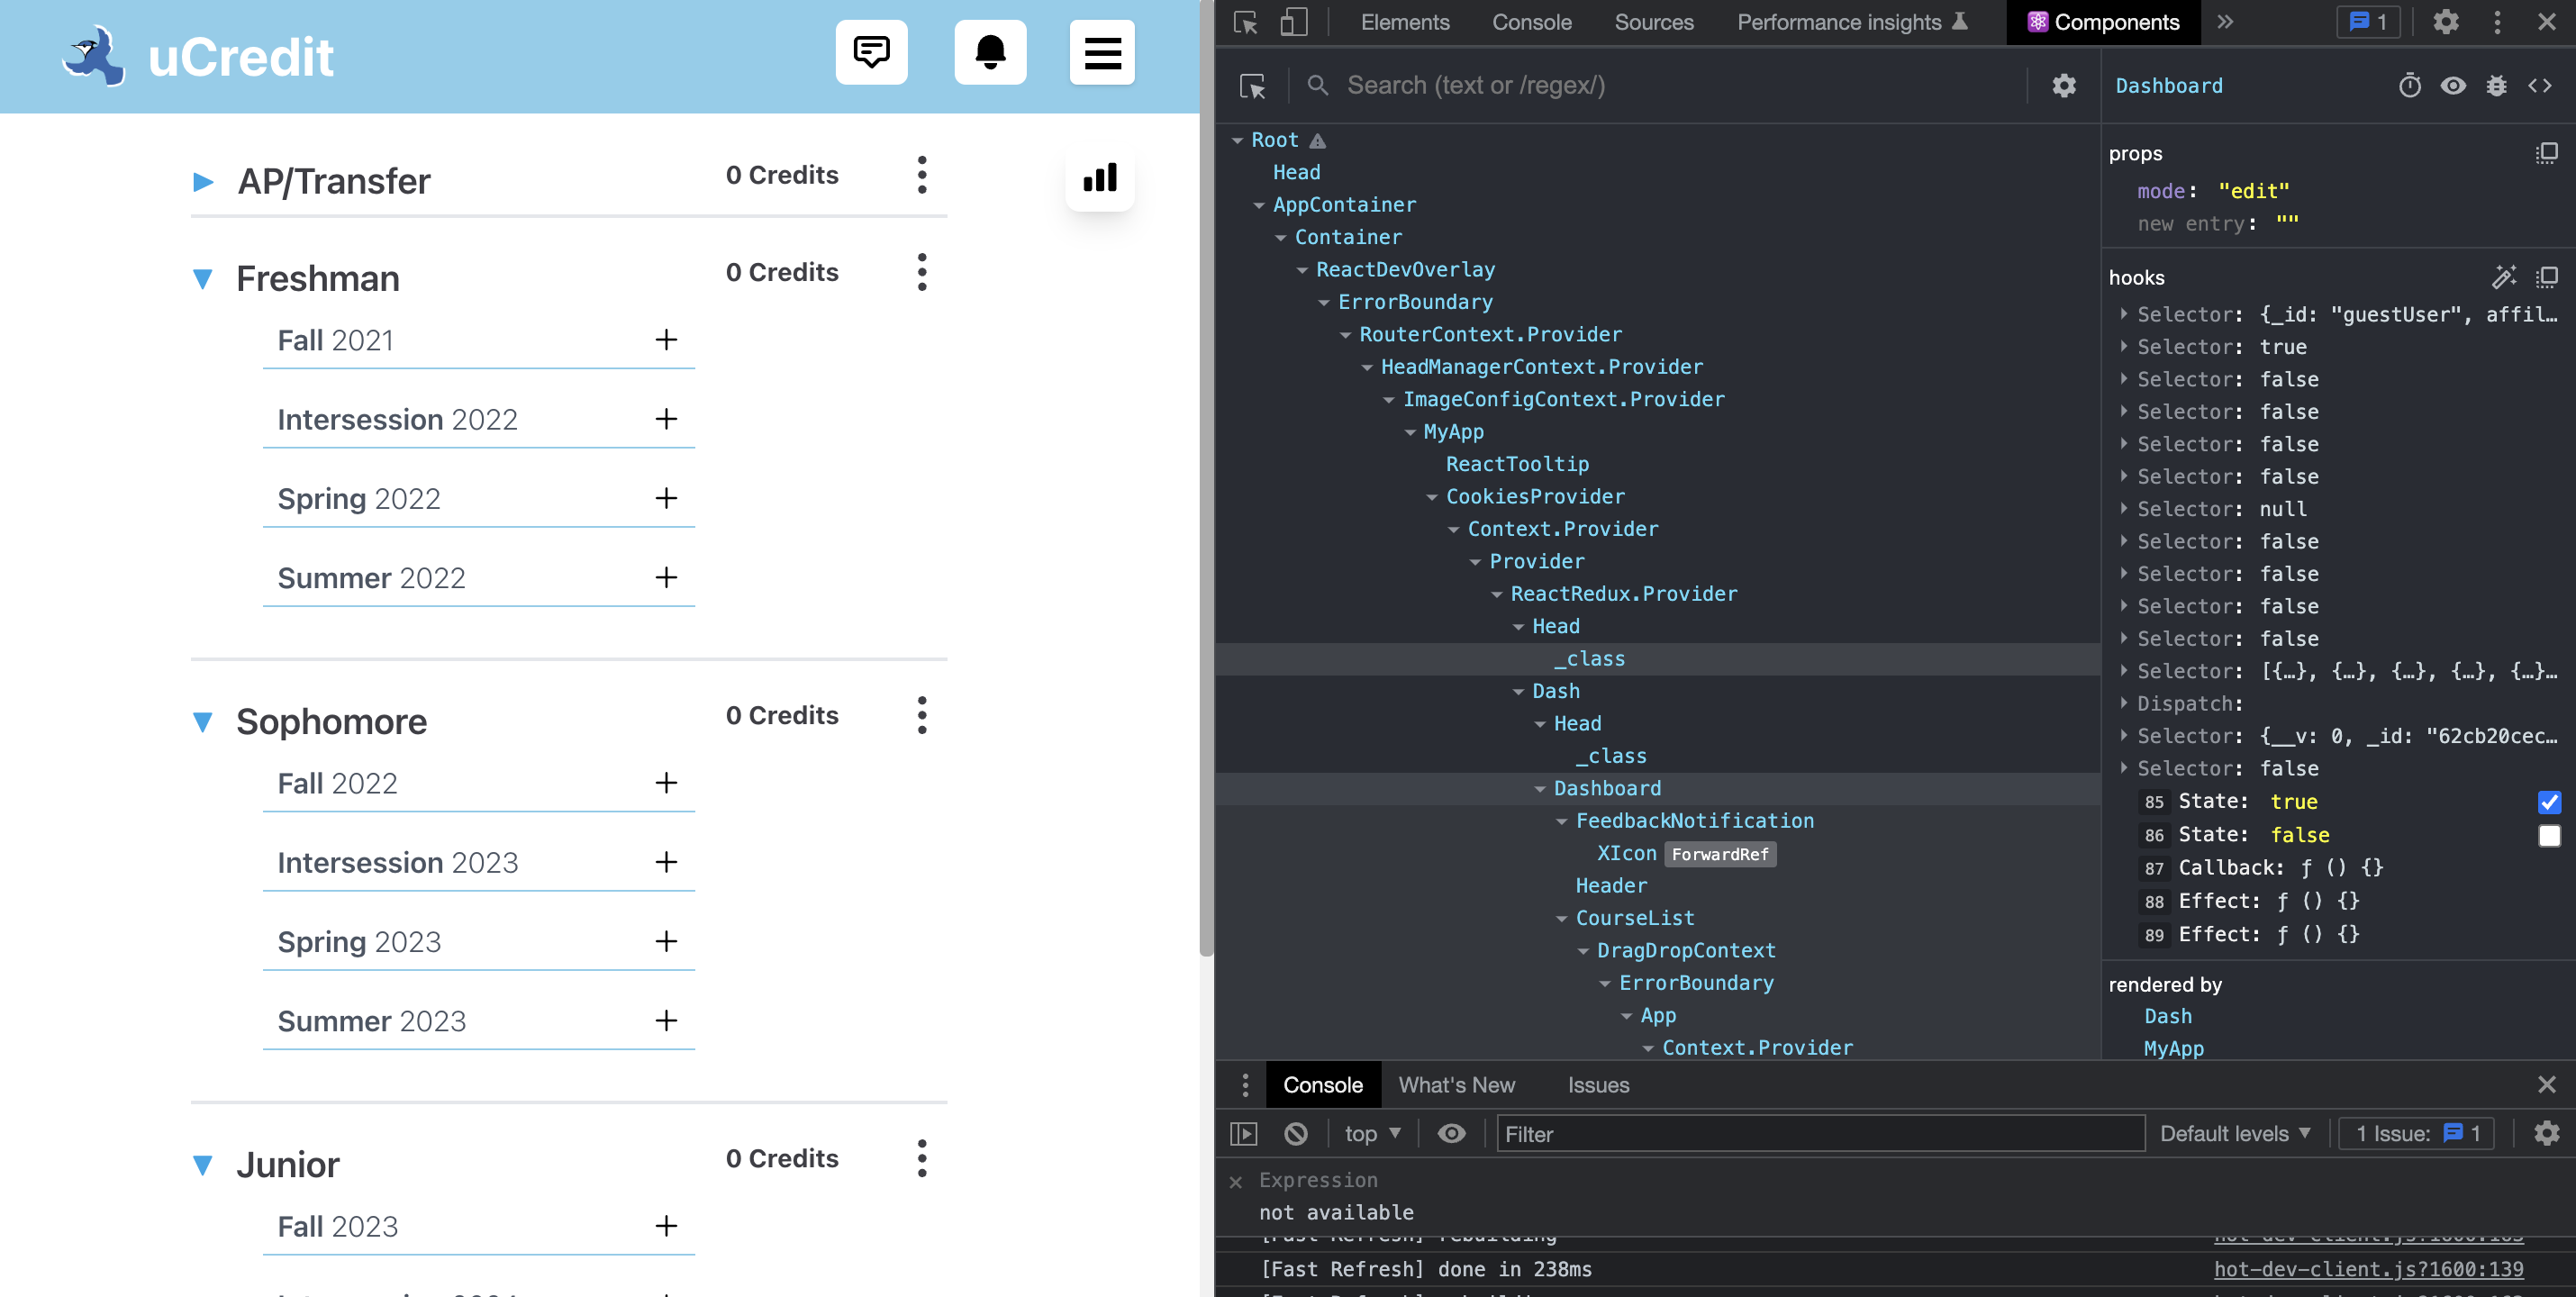
- Use React Developer Tools
React Developer Tools
React Developer Tools is a Chrome DevTools extension that allows you to inspect the React component hierarchies. It is very helpful in understanding the React code behind ucredit.me and debugging.
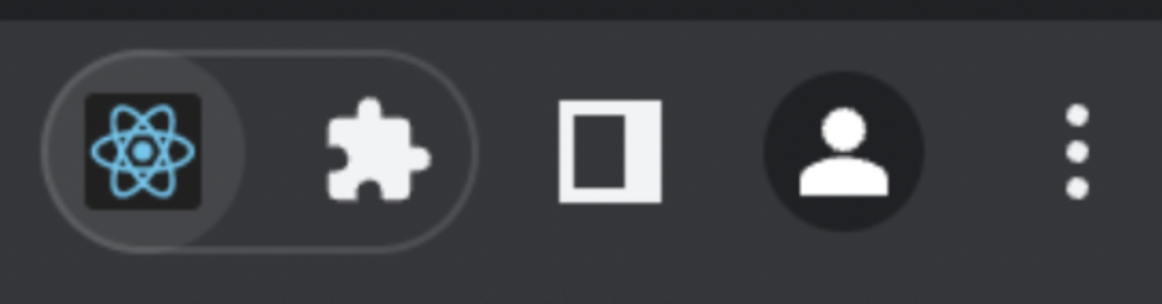
- Install React Developer Tools from Chrome Store.

- Pin it on the Chrome extensions bar.
- Right click on local uCredit website > Inspect > Find Components.
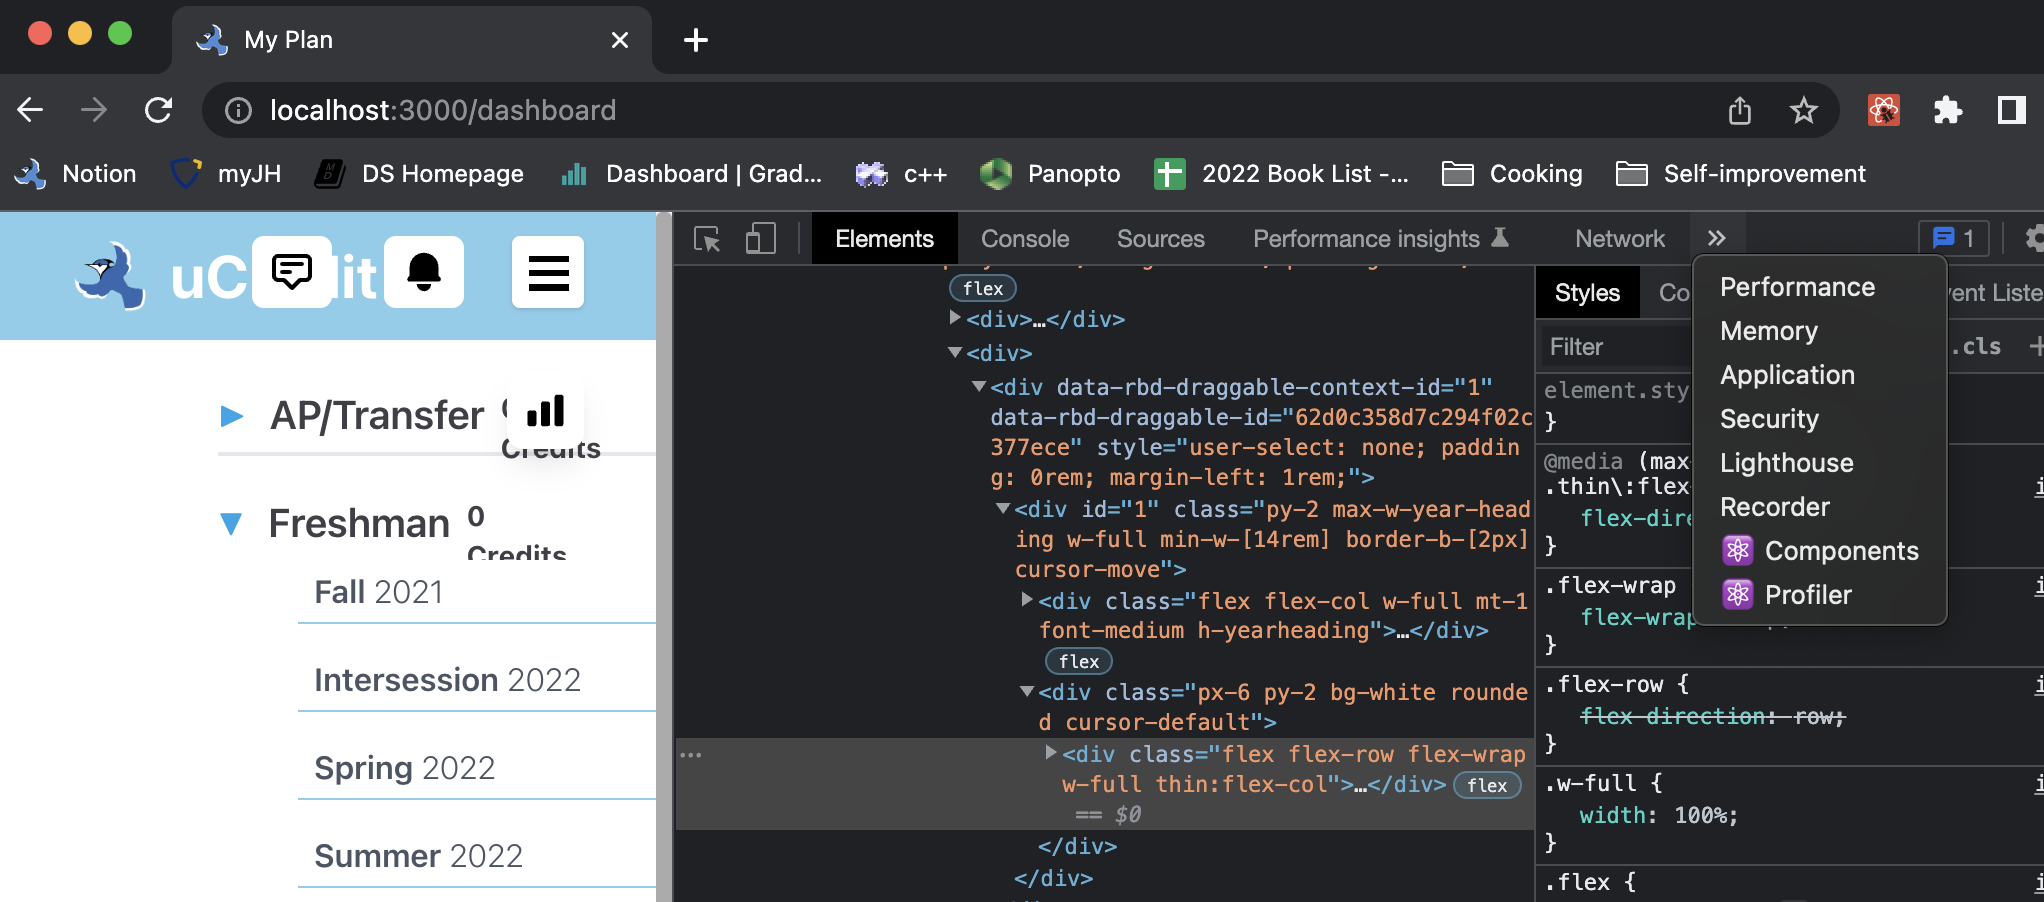
- Click on Components. Now, you will be able to see names of root React components and their subcomponents.
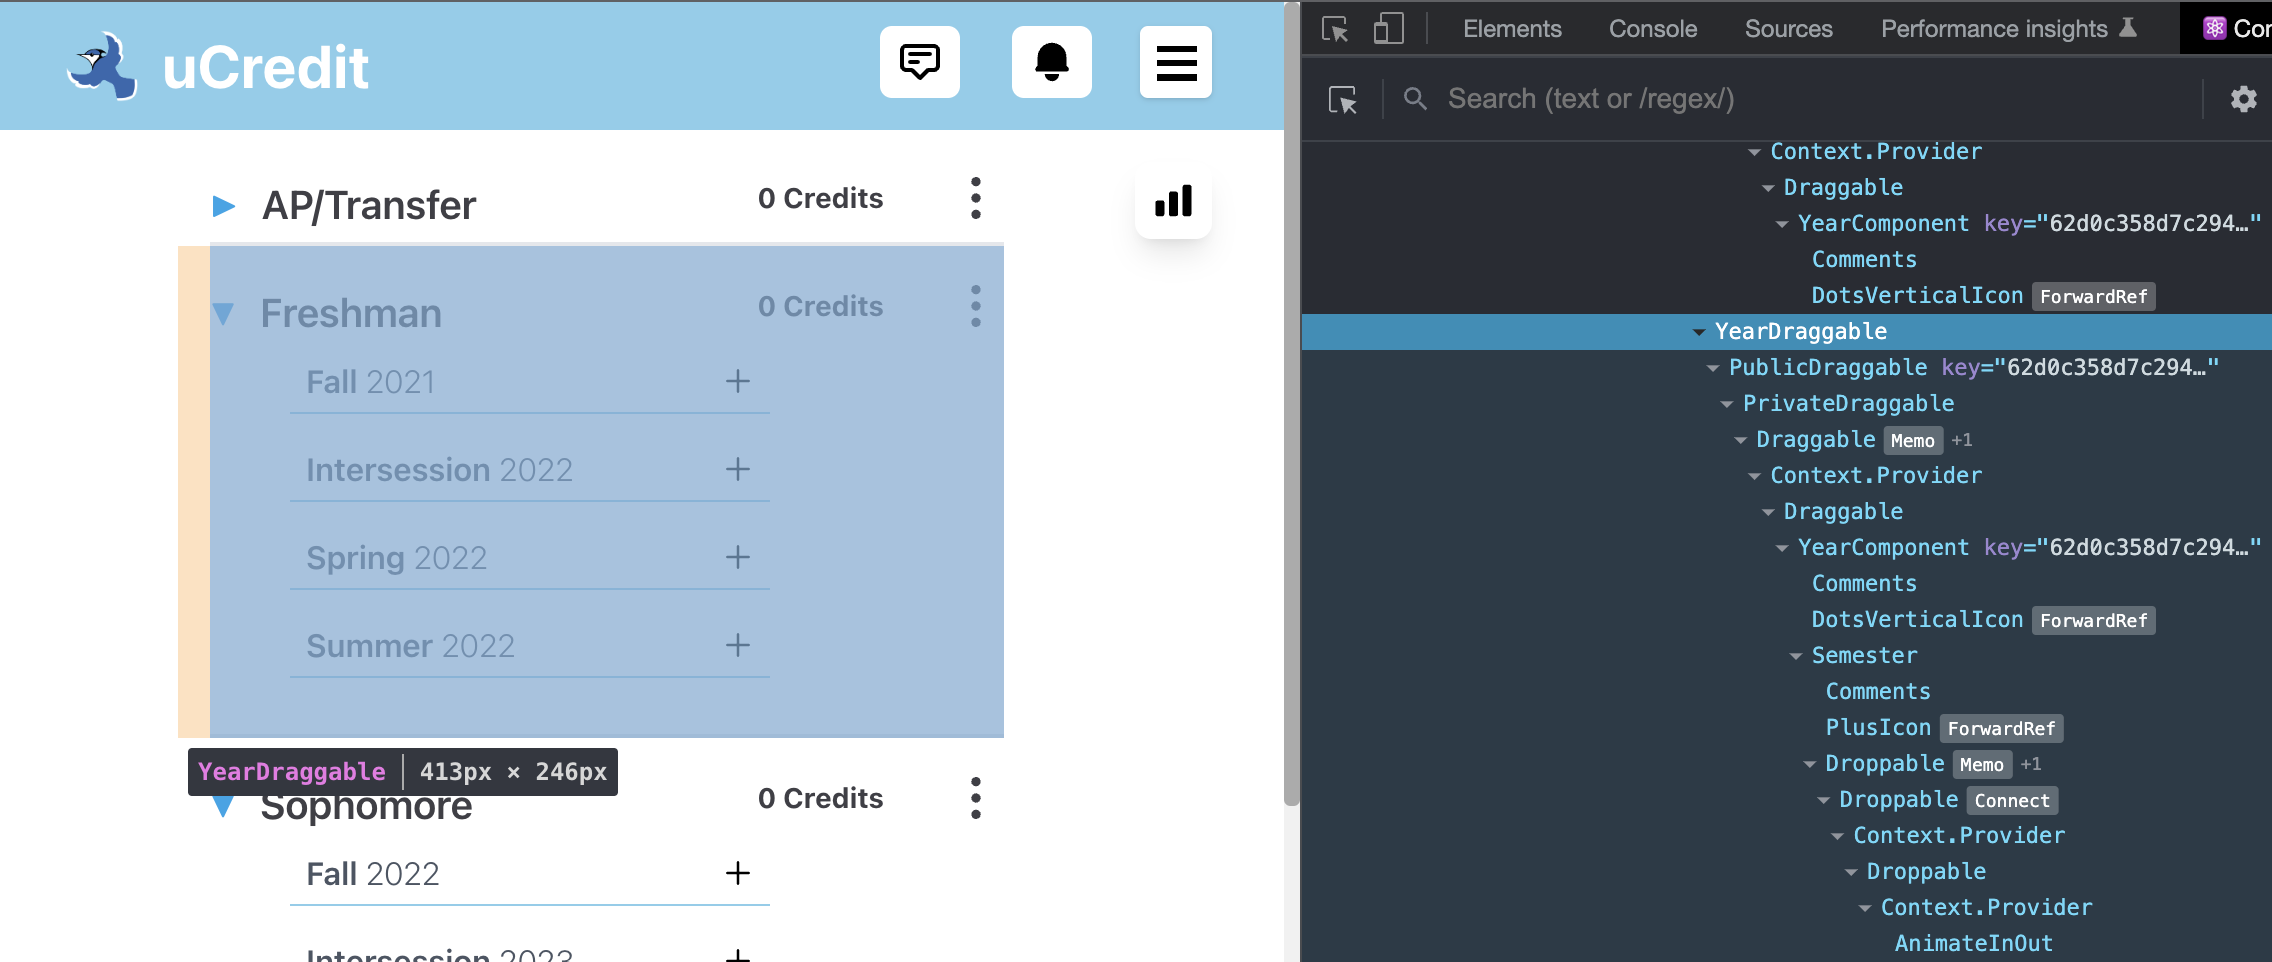
- React Developer Tools is useful when practicing bottom to top approach because you can click on any component in the tree and the high level feature it renders will be highlighted on the website. For example, when you click on YearDraggable, the corresponding year on the plan gets highlighted.
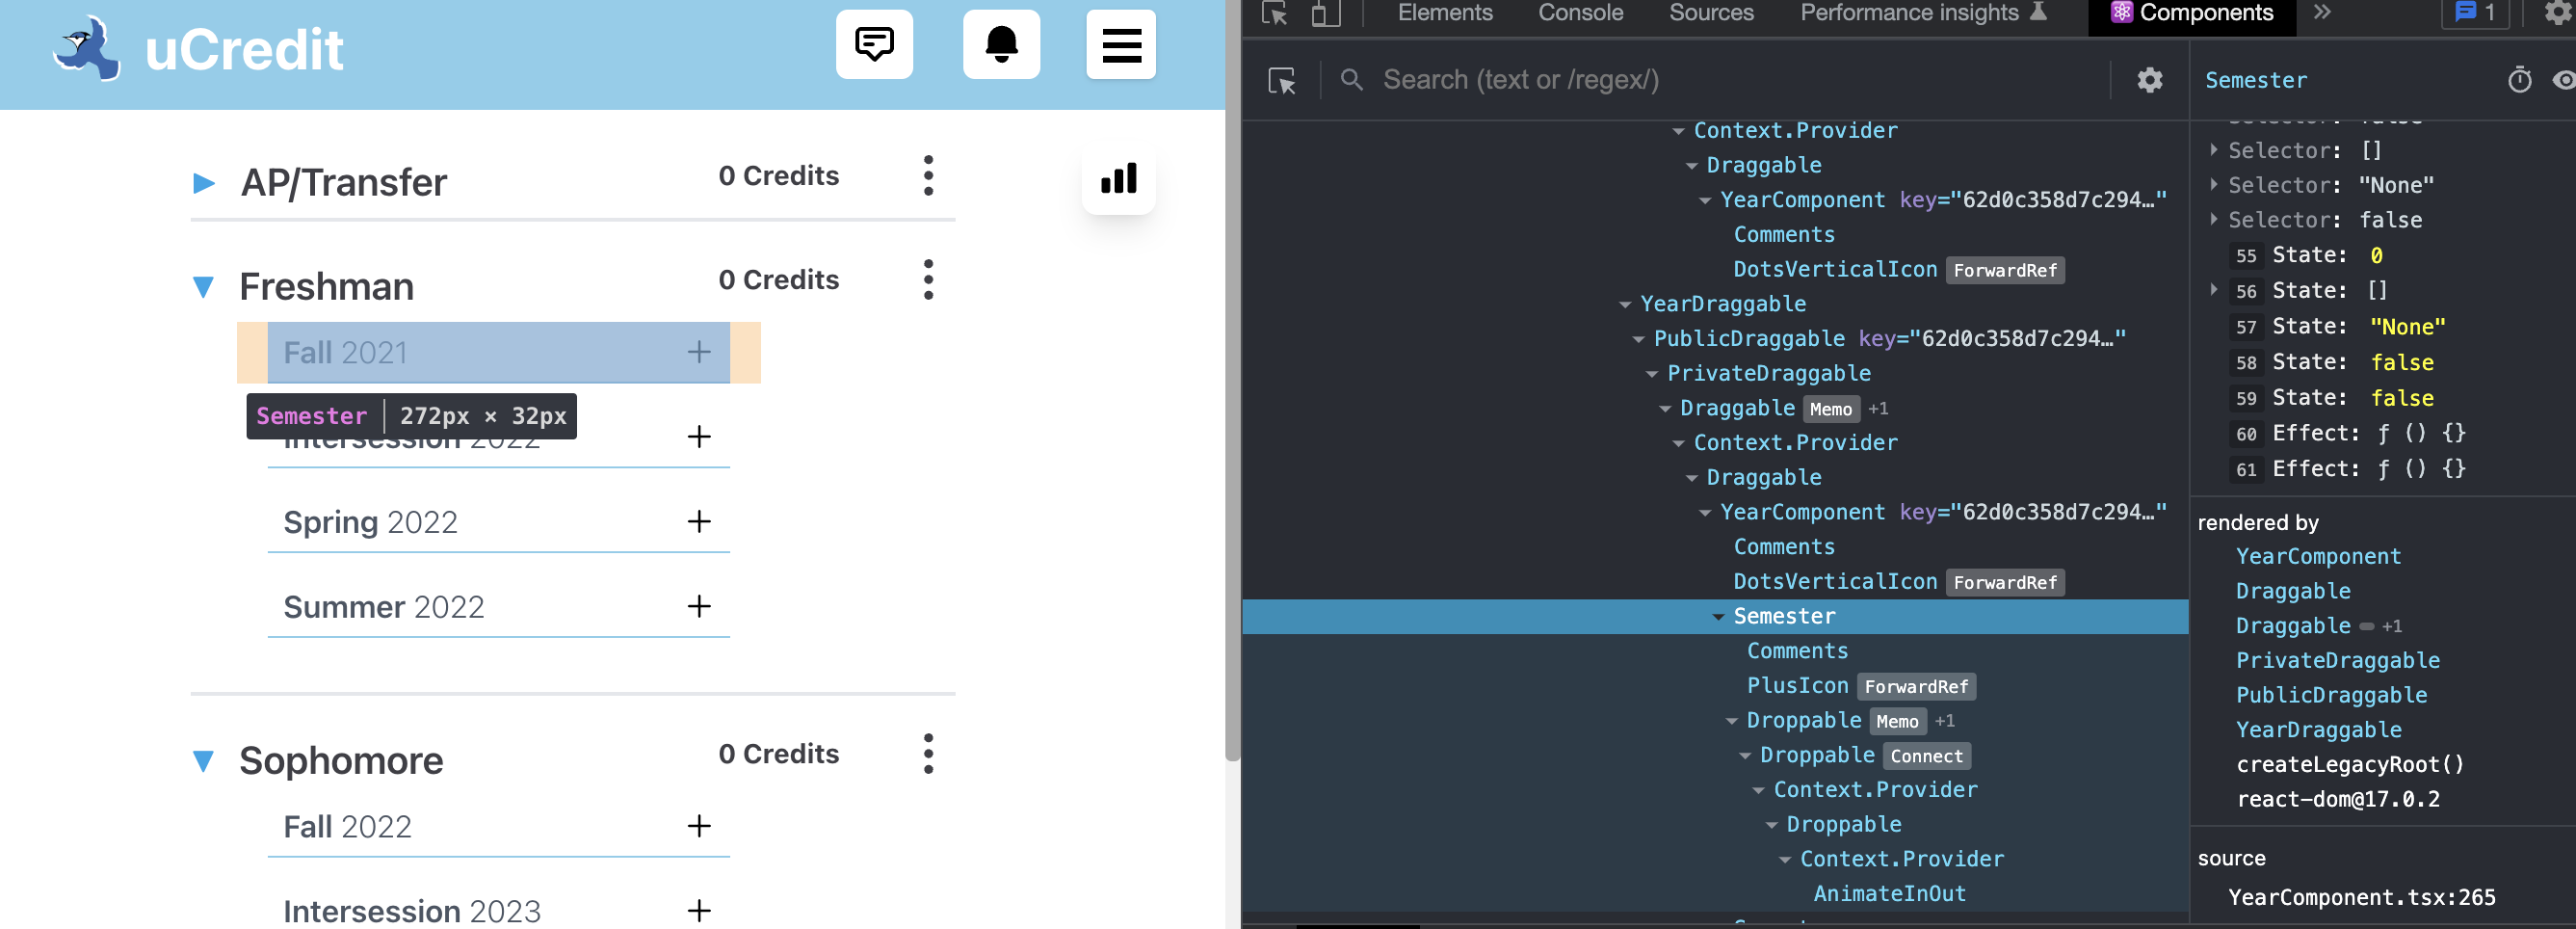
- React Developer Tools also shows props, hooks, relations, and even source file for each highlighted component. For example, when you click on the Semester, you can see its props.
Tips from uCredit senior members
Matt's Overview of frontend codebase
(coming soon)
Make your own structure director of uCredit codebase (from Andy)
- Start with a high level feature/functionality breakdown of the uCredit page. What user interactions occur and where and when do they happen? (For example, a user can add courses (user interaction) on the plan dashboard (where) when they click on the plus sign next to the semester, search for the course, and click add course.
- Open up the codebase and search where the code is located for each feature/functionality. (For example, the files for creating the plan dashboard with years and semesters are located in this directory…)
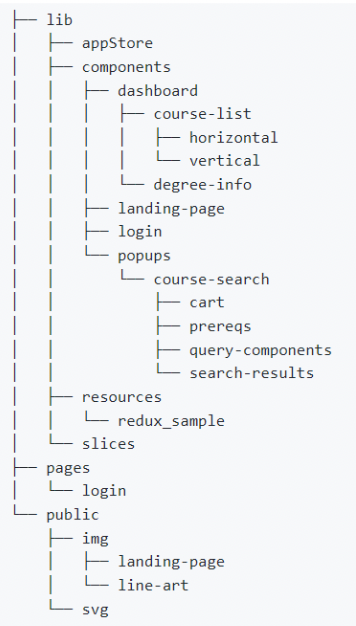
Example of old structure directory of uCredit (needs to be updated):
Try making your own first and compare it with the solution.
Solution
- appStore
- components
- dashboard
- course-list
- horizontal
- vertical
- degree-info
- menus
- comments
- reviewers
- index.tsx
- landing-page
- popups
- course-search
- cart
- prereqs
- query-components
- search-results
- Cart.tsx
- Search.tsx
- more popup files
- reviewer
- resources
- redux_sample
- slices
- currentPlanSlice.ts
- experimentSlice.ts
- popupSlice.ts
- searchSlice.ts
- userSlice.ts
- index.css
- login
- [[...token]].tsx
- reviewer
- [[...id].tsx
- Index.tsx
- _app.tsx
- dashboard.tsx
- index.tsx
- share.tsx
- img
- static
- svg
Andy's Codebase Questions
How are the Course/Semester/Year components composed in the Dashboard?
Answer
- Straightforward answer: YearComponent -> Semester -> CourseDraggable -> CourseComponent. Years have multiple semesters which have multiple courses.
- Detailed answer (subject to change as codebase develops):
- The Year component (located in YearComponent.tsx) takes courses data from the Redux store and parses them in updateSemesterCourses helper method called in the useEffect hook. It then generates and renders Semester components in the getDisplayedSemesters helper method
- The Semester component (located in Semester.tsx) takes in its courses as props and renders the appropriate CourseDraggable components
- The CourseDraggable component (located in CourseDraggable) wraps the CourseComponent and provides draggable functionality
- Finally, the CourseComponent displays course information
How are components composed in the CourseSearch popup?
Answer
Split into two main areas: search and course display- Search related components are located in /search-results and /query-components folders. The search-results directory contains search result display related components (e.g. the results list, individual course result cards), while query-components contains components related to actually searching (e.g. filters, the input form)
- The main CourseDisplay.tsx component is also located in search-results. This is the main information display on the right side which showcases the selected course info, review information, and prerequisites
Where is the search logic located? Can you generally tell how the search algorithm works? (challenging)
Answer
Search logic is in the course search popup, in Search.tsx, but more specifically, in the query-components directory in the Form and formUtils files.